为 NumPy 开发设置 git #
要贡献代码或文档,您首先需要
git 安装在你的机器上
一个 GitHub 帐户
NumPy 的一个分支
安装git #
你可能已经有了 git;通过输入进行检查。如果安装了,您将看到.如果您看到、等,
请安装 git。git --versiongit version 2.11.0command is not recognizedcommand not
found
然后设置您的姓名和电子邮件:
git config --global user.email you@yourdomain.example.com
git config --global user.name "Your Name"
创建 GitHub 帐户#
如果您没有 GitHub 帐户,请访问https://github.com/join创建一个。
创建一个 NumPy 分支#
Forking有两个步骤 - 访问 GitHub 在您的帐户中创建一个 fork 存储库,然后在您自己的计算机上复制它。
创建分叉存储库#
登录您的 GitHub 帐户。
在页面右上角,点击
Fork: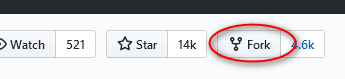
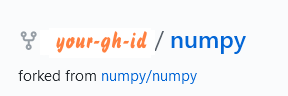
你会看到的

然后您将被带到分叉副本的主页:
制作本地副本#
在要创建副本的目录中,运行
git clone https://github.com/your-user-name/numpy.git
你会看到类似的东西:
$ git clone https://github.com/your-user-name/numpy.git
Cloning into 'numpy'...
remote: Enumerating objects: 12, done.
remote: Counting objects: 100% (12/12), done.
remote: Compressing objects: 100% (12/12), done.
remote: Total 175837 (delta 0), reused 0 (delta 0), pack-reused 175825
Receiving objects: 100% (175837/175837), 78.16 MiB | 9.87 MiB/s, done.
Resolving deltas: 100% (139317/139317), done.
numpy将在您的计算机上创建一个目录。 (如果您已有 numpy 目录,GitHub 将选择不同的名称,例如numpy-1。)$ ls -l total 0 drwxrwxrwx 1 bjn bjn 4096 Jun 20 07:20 numpy
upstream为主 NumPy 存储库命名:cd numpy git remote add upstream https://github.com/numpy/numpy.git
设置您的存储库,以便默认情况下从中提取:
git pullupstreamgit config branch.main.remote upstream git config branch.main.merge refs/heads/main
初始化所需的 git 子模块:
git submodule update --init
从上游拉取最新的标签信息:
git pull
仔细看一下#
显示的分支将包括
git branch -amain您刚刚在自己的计算机上克隆的分支main来自 GitHub 上的 fork 的分支, 默认origingit命名main主 NumPy 存储库上的分支,您将其命名 为upstream。
main
remotes/origin/main
remotes/upstream/main
如果
upstream不存在,它将在您使用或 之类的命令访问 NumPy 存储库后添加。git fetchgit pull显示的存储库将包括您在 GitHub 上的分支和主存储库:
git remote -v showupstream https://github.com/numpy/numpy.git (fetch) upstream https://github.com/numpy/numpy.git (push) origin https://github.com/your-user-name/numpy.git (fetch) origin https://github.com/your-user-name/numpy.git (push)
git config --list会包括user.email=your_email@example.com user.name=Your Name remote.origin.url=git@github.com:your-github-id/numpy.git remote.origin.fetch=+refs/heads/*:refs/remotes/origin/* branch.main.remote=upstream branch.main.merge=refs/heads/main remote.upstream.url=https://github.com/numpy/numpy.git remote.upstream.fetch=+refs/heads/*:refs/remotes/upstream/*
可选:设置 SSH 密钥以避免密码#
克隆 NumPy 分支存储库不需要密码,因为它读取远程存储库而不更改它。不过,稍后提交您的拉取请求将写入其中,并且 GitHub 会要求您提供用户名和密码 - 即使它是您自己的存储库。您可以通过设置 SSH 密钥来消除此身份验证,而不会影响安全性。
如果您在克隆之前设置密钥,则上述说明会略有不同。代替
git clone https://github.com/your-user-name/numpy.git
运行
git clone git@github.com:your-user-name/numpy.git
并且不会显示httpsURL, 而是显示git remote -v
origin  git@github.com:your-user-name/numpy.git (fetch)
origin  git@github.com:your-user-name/numpy.git (push)
如果您已经克隆并想要开始使用 SSH,请参阅 将远程 URL 从 HTTPS 切换到 SSH。